Configure the Ionic/Angular project for CI/CD Deploy - Create a Firebase project. Configure CI/CD on GitLab.
Here I’m going to show you how to setup your ionic Angular project continuous integration and deployment pipeline using the GitLab CI for continuous integration service for your Ionic Angular project. Step by step:- First lets create a new Ionic project. Make sure you have Ionic CLI tools installed by running:
Window OS : npm install -g ionic
Mac/linux OS:sudo npm install -g ionic.
Lets create a sample project using command,
Ionic start project using the tabs layout or side menu
example :
ionic start myProject tabs -type=angular Pick a framework! 😁
Pick a framework! 😁

Please select the JavaScript framework to use for your new app. To bypass this
prompt next time, supply a value for the --type option.
? Framework: (Use arrow keys)
❯ Angular | https://angular.io
  React   | https://reactjs.org

Would you like to share anonymous usage data with the Angular Team at Google under
Google’s Privacy Policy at https://policies.google.com/privacy? For more details and
how to change this setting, see http://angular.io/analytics. (y/N)
First test commands directly from the command line.
cd myProject ionic serve
then Visit www.gitlab.com and create a new account
in your project (myProject) add on gitlab
After create project on gitlab use command and add Origin in your root project.
  git remote add origin https://gitlab.com/<Yourprojectpath>/myproject.git
  git add .
  git commit -m "Initial commit"
  git push -u origin master
Now, Deploy & hosting with firebase. let us see easy steps
- go to https://console.firebase.google.com/
- Click on add a project & fill the project name & continue.
- configure google Analytics select and click on create project.
First need to build app for prod with command to create our to create our www files.
ionic build --prod OR npm run build --prodNext we will deploy our application using the Firebase command Install Firebase-tools in global run below command ⬇️⬇️⬇️
                    Window OS: npm install -g firebase-tools
                    Mac/linux: sudo npm install -g firebase-tools
Using firebase command to login into firebase.
Firebase loginNeed to initialize your site. This will create a firebase.json file to use during the deployment of your application.
By running:
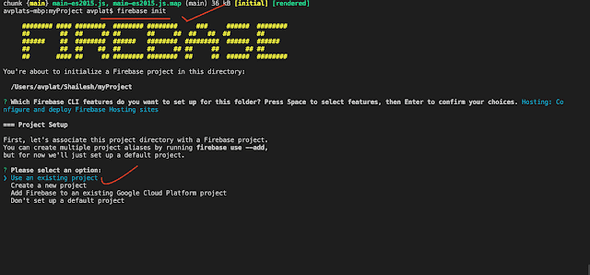
firebase initNow the dialog will bring up some options and we need to select hosting(using space, then tab enter to continue to next steps).

Next select the project which is you are using in firebase console. After this you will be promoted with the following question.
? Which Firebase CLI features do you want to set up for this folder? Press Space to select features, then Enter to confirm your choices. Hosting: Co
nfigure and deploy Firebase Hosting sites
then Select to existing project ? Please select an option: Use an existing project
After select your project. Then select a default Firebase project for this directory: myproject-b0c94 (MyProject)
 our public directory is the folder (relative to your project directory) that
will contain Hosting assets to be uploaded with firebase deploy. If you
have a build process for your assets, use your build’s output directory.
? What do you want to use as your public directory? WWW
you would type www for the public directory
Next specify yes to ? Configure as a single-page app (rewrite all urls to /index.html)? (y/N) yes
and no to Overwrite index html ? File www/index.html already exists. Overwrite? (y/N) No
 now automatically generate firebase.json file its look like this.
{
 "hosting": {
 "public": "www",
 "ignore": [
 "firebase.json",
 "**/.*",
 "**/node_modules/**"],
 "rewrites": [
 {
 "source": "**",
 "destination": "/index.html"
 }]
 }}
next we need once prod build.
ionic build --prod and deploy to firebase using command
firebase deployNow ✔ Deploy complete! & will be available for access through the link provided in the console. Hosting URL: https://myproject-b0c94.firebaseapp.com
Now,
Integrated Continuous Delivery GitLab.
Now look into your project directory you will have a file firebaserc.
{
  "projects": {
    "default": "myproject-b0c94"
    "development": "<your dev project id here>",
    "production": "<your production id here>",
    "testing": "<your production id here>"
  }
}
if use your use two deferent workflow like development and production. you can add. go with step wise just follow the bellow command
firebase login:cithis will login into your firebase Account in a Browser after that just look into terminal you will see a key.
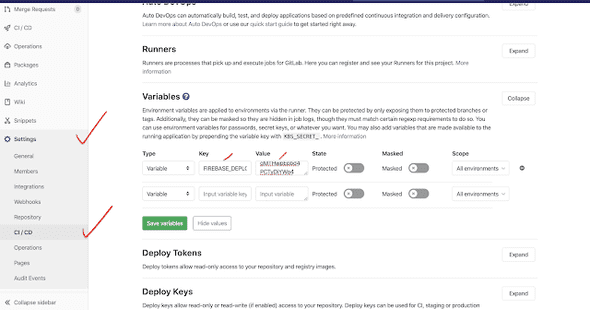
copy this key and go to your gitlab project , go to setting and choose CI/CD. in variable click on expand and add key value like show in bellow.
 Now we need to create environment
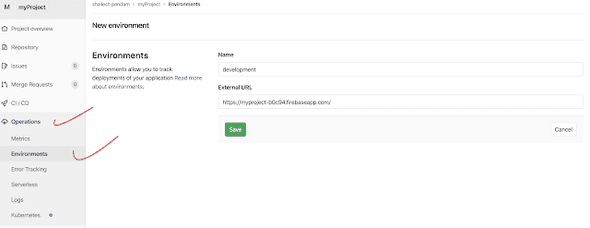
in gitlab left side menu goto operations and click on Environments & create new environment called development or you choice , (production) like show in bellow.

In environment that External URL its called your hosting link you can found in firebase console under hosting
now create a new file in your root directory name with .gitlab-ci.yml file. and add configuration of the deployment Processes.
in .gitlab-ci.yml add this code.
image: node:latest
cache:
paths:
- node_modules/
stages:
- deploy
deploy:
stage: deploy
environment:
name: development
script:
- npm install
- npm install -g firebase-tools
- npm run build --prod
- firebase use --token $FIREBASE_DEPLOY_KEY development
- firebase deploy --non-interactive --token $FIREBASE_DEPLOY_KEY
only:
- master
here just one job stage for deploy we can cad multiple jobs. but for now we using just deploy job in the script npm install for installing all the dependence’s , npm install -g firebase-tools for firebase-tools install in server , then production build then deploy to firebase there set —token $FIREBASEDEPLOYKEY development token environment. if you push code to gitlab After merge then automatically your project will deploy with firebase ✌️😎😎🙈


